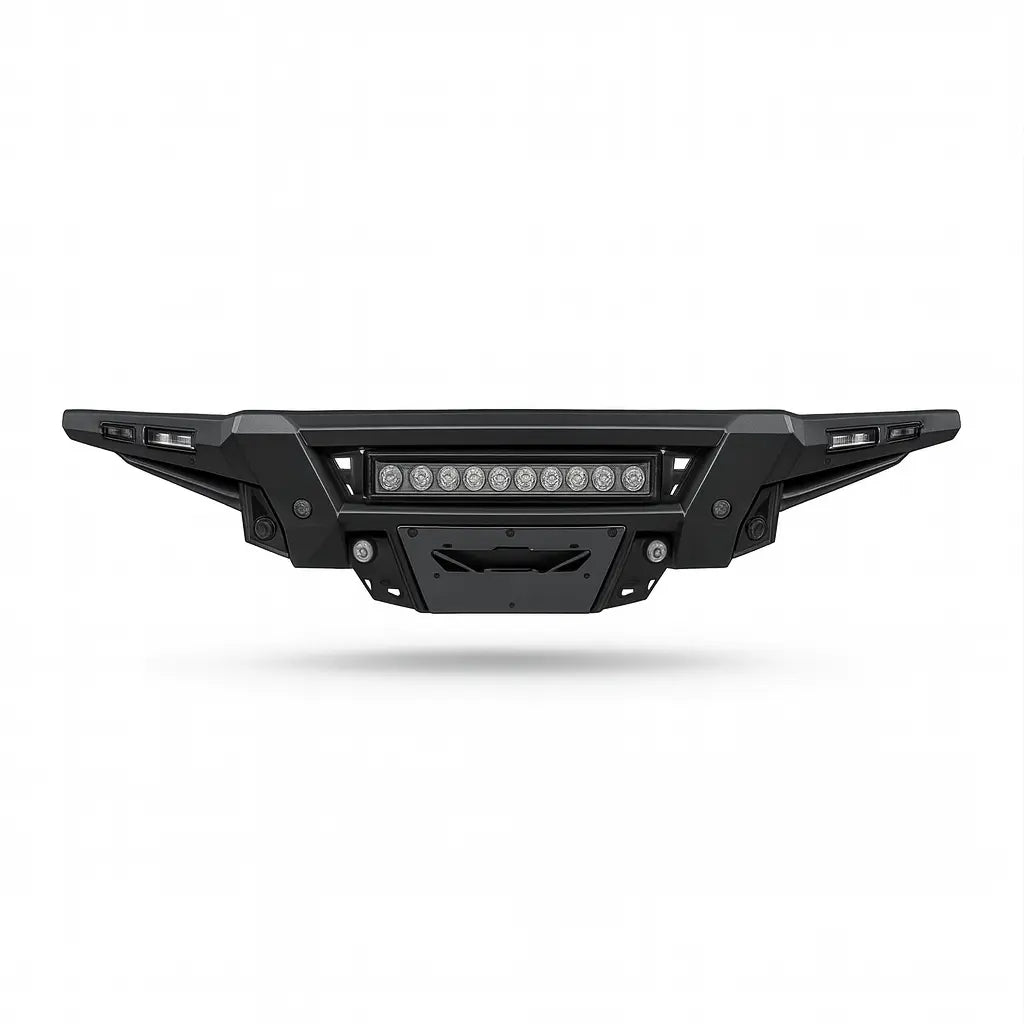
Addictive Desert Designs Phantom Front Bumper Install (2021–2025 Ford Raptor/Raptor R)
Meet the Phantom Series Front Bumper from Addictive Desert Designs (ADD)—built for serious approach angles, clean sensor integration, and stout protection without the bulk. This guide walks you through removing the OEM bumper and installing the Phantom on 2021–2025 Ford F-150 Raptor & Raptor R models.
- Browse the full ADD lineup: Shop all Addictive Desert Designs
- Go straight to this part: ADD Phantom Front Bumper — SKU F210263200103
Skill Level: Easy/Intermediate (two people recommended)
Total Time: ~4 hours for OEM removal + install, +1 hour to wire cube lights (if applicable)
What You’ll Need
Sockets: 7/16, 9/16, 3/4, 8 mm, 10 mm, 13 mm, 15 mm, 21 mm
Wrenches (box-end): 7/16, 9/16, 3/4, 8 mm, 10 mm, 13 mm, 15 mm, 21 mm
Allen/Hex keys: 5/32, 7/32, 5/16
Other: Ratchet, fastener remover or flathead screwdriver, zip ties, anti-seize
Pro Tips
• Read the entire guide before starting.
• Disconnect the negative battery terminal. Park on level ground and set the parking brake.
• For button head bolts, install the supplied washer on the nut side. Hold the bolt stationary; turn only the nut unless otherwise noted.
• Apply anti-seize to all fasteners.
• Two people make alignment and mounting far easier.

What’s in the Box (Hardware)
- (2) 1/2"-13 × 1-1/2" button-head bolts
- (2) 1/2" flat washers
- (2) 1/2"-13 nylon lock nuts
- (8) 1/4"-20 × 1" button-head bolts
- (8) 1/4" flat washers
- (8) 1/4"-20 nylon lock nuts
- (2) 3/8"-16 × 1-1/2" hex-head bolts
- (11) 3/8" flat washers
- (5) 3/8"-16 nylon lock nuts
- (4) 1-1/4" button-head bolts
- (Provided) 3/8" nut clips (for skid plate mounts)
Note: Verify your kit contents before starting. If anything’s missing, pause and contact support before disassembly.
Step 1 — Remove OEM Skid Plate (13 mm socket)
Remove the six (6) bolts holding the OEM skid plate.


Step 2 — Remove Skid Plate Spacer
With the skid plate off, remove the spacer.


Step 3 — Remove Bumper Support Brackets (8 mm socket)
Remove the support brackets that tie the bumper to the frame horns. Repeat on both sides.


Step 4 — Unplug Main Front Bumper Harness
Passenger side: pull the gray tab back to release, then disconnect the plug.

Step 5 — Remove Bumper-to-Frame Mounting Bolts (21 mm socket)
Remove the frame horn mounting bolts on both sides. Support the bumper as you remove the last fasteners.


Step 6 — Intercooler Guard & Shutter Motor (10 mm socket)
Remove the intercooler guard bolts. Remove the shutter motor from the guard and zip-tie it to the harness once installed on your ADD bumper.
2024 models: follow the dedicated Shutter Motor Bracket instructions: HERE


Step 7 — Remove Tow Hooks & Skid Plate Mount (15 mm & 13 mm sockets)
Remove both tow hooks and the skid plate mount.


Step 8 — Replace OEM Nut Clips with Provided 3/8" Nut Clips
Swap the OEM clips at the skid plate bottom mounts.

Step 9 — Expose Harness Covers (10 mm socket)
Remove the covers to access the wire harness.


Step 10 — Transfer Parking Sensors & Harness
Remove all four parking sensors and their bezels from the stock bumper. Remove the harness.

Step 11 — Install Parking Sensor Mounts (5/32" Allen, 7/16" wrench)
Use the 1/4" button-head bolts, washers, and nylon lock nuts to mount the parking sensor brackets. Repeat for all positions.

Step 12 — Install Sensor Bezels into ADD Bumper
Snap the bezels into the Phantom bumper.
If a bezel doesn’t click into place, trim the tabs slightly to match bumper thickness.

Step 13 — Install Light Mount Brackets (5/32" Allen, 7/16" wrench)
Attach the light mounts using the 1/4" button-head bolts, washers, and nylon lock nuts.

Step 14 — Assemble Skid Plate Bottom Mount (7/32" Allen, 9/16" wrench)
Join the skid plate bottom mount to the skid plate using 3/8" button-head bolts, washers, and nylon lock nuts.

Step 15 — Mount Skid Plate to Bumper (7/32" Allen, 9/16" wrench)
Install the skid plate onto the bumper with the provided 3/8" button-head bolts, washers, and nylon lock nuts.

Step 16 — Install 3/8" Nut Clips into Bumper Slots
Seat the nut clips in the bumper’s slotted locations (both sides).

Step 17 — Re-install Wire Harness (Passenger-side main plug)
Route and install the harness into the bumper; verify each parking sensor orientation matches the reference (flat face forward, connectors aligned).

Step 18 — Hang & Align Phantom Bumper (5/16" Allen, 3/4" wrench)
Lift the Phantom bumper into place (two people). Use the 1/2" button-head bolts, washers, and nylon lock nuts.
Ensure the skid plate sits under the rock guard.


Step 19 — Secure with 3/8" Hardware (9/16" socket)
Install the 3/8" hex-head bolts, washers, and nylon lock nuts to lock the bumper in position.

Step 20 — Reconnect Main Harness
Plug the main bumper harness back in. Make sure the locking clip is fully seated.

Step 21 — Final Checks
- Verify sensor orientation and function.
- Torque all hardware (recheck after 100 miles, then periodically).
- Wire auxiliary cube lights (+1 hour typical) per your chosen switches/triggering.
Troubleshooting & Tips
- Sensors throw alerts: Confirm each sensor is fully seated and oriented correctly; inspect harness connections.
- Bezel won’t snap: Carefully trim tabs as shown in Step 12 and retry.
- Bumper alignment off: Loosen hardware, adjust gaps at fenders/grille, re-torque while a second person holds position.
- 2024 shutter motor: Use the dedicated bracket guide (ADD_2024_SHUTTER_BRACKET_GUIDE).
Fitment Notes / Disclaimers
- Vehicle: 2021–2025 Ford F-150 Raptor & Raptor R.
- Wiring labor: Estimate is for standard switch locations and simple cube lights; custom triggers or switch placement may increase time.
- Pre-existing damage can affect install time and alignment.
Quick Specs
- Brand: Addictive Desert Designs
- Series: Phantom
- Position: Front
- SKU: F210263200103
- Sensors: Designed for OE parking sensors
- Lighting: Supports cube light mounts (sold separately)
FAQs
Will my factory parking sensors work?
Yes—transfer your OE sensors and bezels (Steps 10–12) and orient as shown in Step 17.
Do I need to trim anything?
Possibly the sensor bezel tabs if they don’t snap into the thicker bumper skin (Step 12). No cutting to the truck is typically required.
Can I reuse tow hooks?
Tow hooks are removed with the OEM bumper (Step 7). If you need front recovery points, consider ADD-compatible solutions or shackle mounts designed for this bumper.


